A window used to export results data to text or image files.
Description
This window allows you export information from your session to a text or image file. Table data gets exported to a text file, while graph data gets exported to an image file. A detailed description of the files can be found in the Export Files section. You can either export the information for just the cohort you are looking at, or for all cohorts in your results (all of the cohorts displayed in the Cohort Tree List). You can configure how your data gets exported by using the Export Options tab of the Options Window.
Controls
-
Base File Name and Path edit box - The base file name and path to use for the export. Since multiple files may be created for an export, this filename is just the base of the filename. The specific section will be appended to the filename when it is written. For example, if you put "c:\Documents\Export1" in this edit box, then all of the export files will be written to your c:\Documents directory. The files written will be named Export1_Incidence.txt, Export1_Incidence.png, Export1_Survival.txt, Export1_Survival.png, etc.
-
Browse button - Pressing this button will display the File Open dialog to let you select a patch and base filename to put into the Base File Name and Patch edit box.
-
Selected Cohort radio button - This option indicates that you would like to only export data for the current cohort you are viewing in the Main Window.
-
All Cohorts radio button - This option indicates that you would like to export data for all of the cohorts in your current session (all of the cohorts listed in the Cohort Tree on the Main Window).
-
Overlaid radio button - This option is only available if you select "All Cohorts" for export. This option indicates that you would like the graphs to display all of the cohorts on the same graph (much like the Multi-Cohort view mode on the Main Window).
-
Separate radio button - This option is only available if you select "All Cohorts" for export. This option indicates that you would like the each cohort to have a separately exported graph. This and previous option are only for graphs, because tables always export into the same file.
-
Select All button - Press this button will selection all of the "Sections to Export" check boxes.
-
Select None button - Press this button will unselect all of the "Sections to Export" check boxes.
-
Sections To Export check boxes - This section allows you to configure what information you would like export. Each check box corresponds to a table or graph on the Main Window (or a page of data for the Settings tab). The format and types of files are determined by your Export Options.
-
Export Options button - Press this button will display the Export Options tab of the Options Window. This will allow you to configure how your fields are written, the delimiter for your text files, and the type of image file used and its size.
-
OK button - Press this button to begin the export process. When it completes, a message will be displayed.
-
Cancel button - Press this button to cancel exporting and to close the window.
-
Help button - Press this button to close this window.
Example
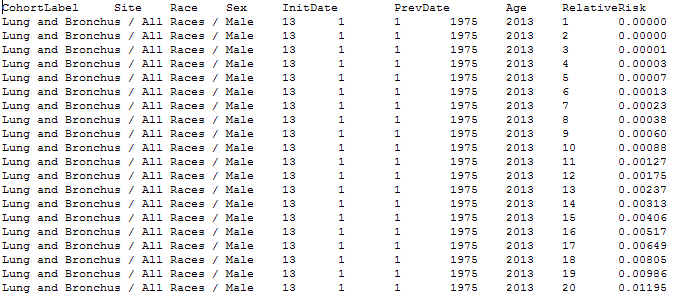
Here is an example of what the Incidence table export looks like with the default settings:

Here is an example of what the Incidence graph export looks like with the default settings:

Related Items
