
A window used to set options for the entire ComPrev application.

Description
This window is used to configure settings used by the ComPrev application.
Controls
-
User tab - This tab displays the User tab and is used to set user directories and options.
-
Precision tab - This tab displays the Precision tab and is used to set numerical precision used in tables.
-
Export tab - This tab displays the Export tab and is used to configure the exports from the program.
-
Age Groups tab - This tab displays the Age Groups tab and is used to configure collapsible age groups.
-
OK button - Press this button to save your changes and close the window.
-
Cancel button - Press this button to cancel your changes and close the window.
-
Help button - Press this button to display this help page.
Related Items
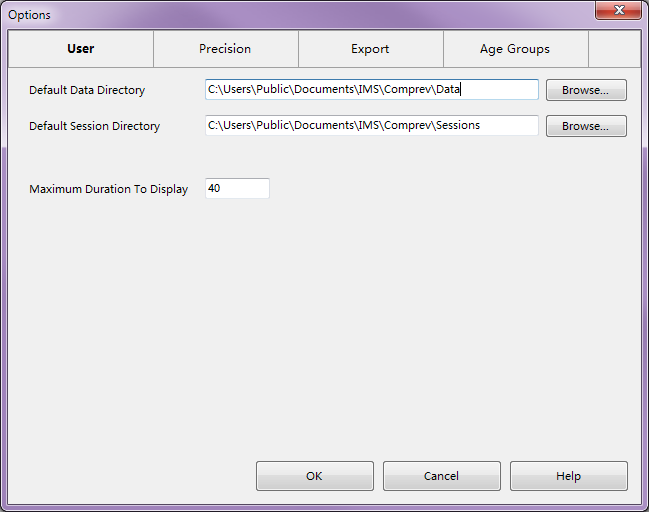
A tab on the Options window used for setting user options.
Description
This tab is used to configure directories and user settings used by the ComPrev application.
Controls
-
Default Data Directory edit box - This edit box allows you to select the default directory where data sources are located.
-
Browse button - Press this button to display the File Open dialog to select a directory. The directory selected will be used for the Default Data Directory.
-
Default Session Directory edit box - This edit box allows you to select the default directory where new sessions are saved to.
-
Browse button - Press this button to display the File Open dialog to select a directory. The directory selected will be used for the Default Session Directory.
-
Maximum Duration To Display edit box - This edit allows you to configure the maximum duration to display on tables and graphs. This is mainly used for the durations displayed on the Survival Tab of the Main Window.
Related Items
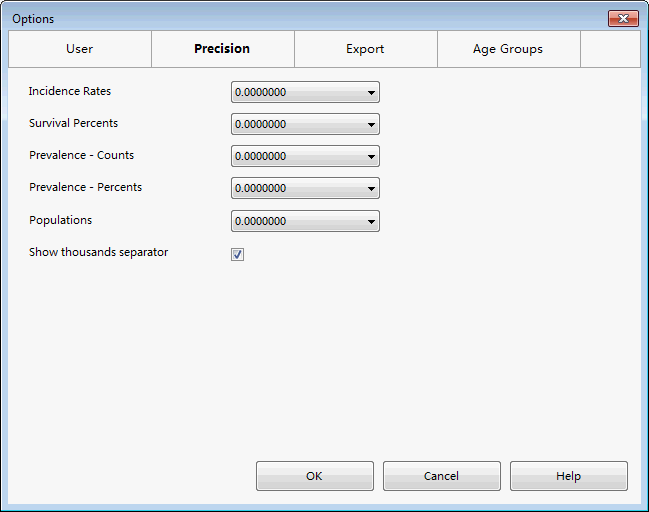
A tab on the Options window used for setting the level of precision for values.

Description
This tab is used to configure how numbers are displayed in tables on the Main Window.
Controls
-
Incidence Rates combo box - This selection allows you pick how many decimal places you would like displayed for Incidence Rates.
-
Survival Percents combo box - This selection allows you pick how many decimal places you would like displayed for Survival Percents.
-
Prevalence - Counts combo box - This selection allows you pick how many decimal places you would like displayed for Prevalence Counts.
-
Prevalence - Percents combo box - This selection allows you pick how many decimal places you would like displayed for Prevalence Percents.
-
Populations combo box - This selection allows you pick how many decimal places you would like displayed for Populations amounts.
-
Show thousands separator check box - This option determines whether commas are added to large numbers to delineate thousands.
Related Items
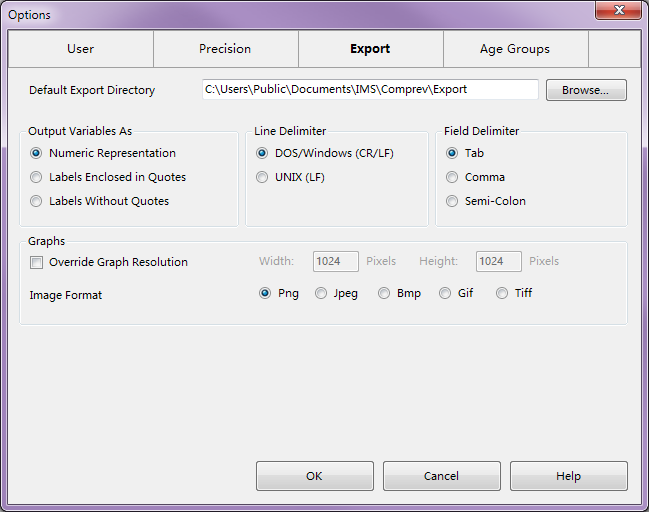
A tab on the Options window used for setting export options.

Description
This tab allows you to configure how exports are performed.
Controls
-
Default Export Directory edit box - This control allows you to specify the default directory location for exports to be performed. Users can still override this location in the Export Window.
-
Browse button - This button will display the Open File dialog to allow you to pick a directory location on your hard drive. This location is placed in the Default Export Directory edit box.
-
Output Variables As group - This selection determines how variables are written into text files. In the data files, each variable has both a text label such as "Male" and an underlying value such as "1". This selection determines whether the numeric value is written, the label in quotes, or just the label. Continuing the previous example, either 1, "Male", or Male would be written into the text file. Sometimes quotes are needed around labels if the label contains a space or other odd characters.
-
Line Delimiter group - This selection determines what is written at the end of each line in the text file. Different environments use different end of line characters. In Windows and Dos, then end of line indicator is carriage return followed by line feed. In a Unix environment, the end of line indicator is just a line feed.
-
Field Delimiter group - This selection determines what is written between fields in a text file to distinguish them from each other. You can select either a tab, a comma, or a semi-colon. Tab is a good choice if you intend to use the exported file within Excel.
-
Override Graph Resolution check box - This option determines whether you would like to override the graph resolution saved to file. The default is to save the graph at the same resolution as it is displayed on screen. With this option on, you can save the file in a larger format (which is good if you intend to use the image in print). When this option is on, the Width and Height edit boxes will become accessible.
-
Width and Height edit boxes - These entries allow you to set the width and height in pixels of export graphs. These are only available if you override the graph resolution. The minimum side is 1 pixel and the maximum is 10,000. Keep in mind that a size of 1 pixel is useless, and a size of 10,000 may not be possible based on the memory of your system.
-
Image Format group - This selection determines the type of image file to write when exporting graphs. The most compact and versatile format is PNG, but JPG is another commonly used image format.
Related Items
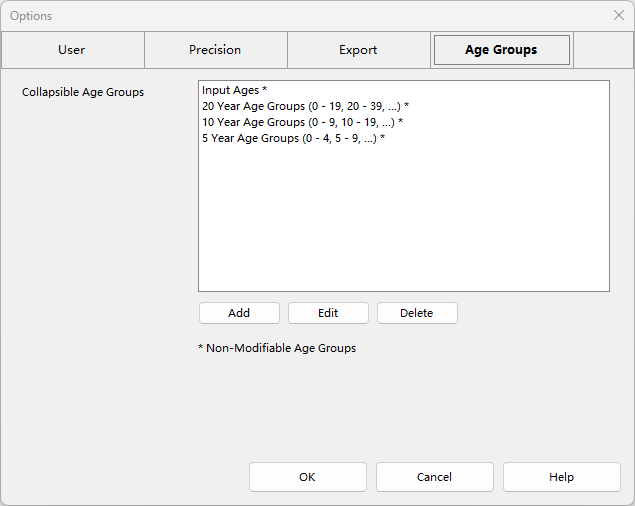
A tab on the Options window used for creating age groups.

Description
This tab is used to manage collapsible age groups. Collapsible Age Groups are used on the Prevalence Estimates Tab and Phase of Care Tab of the Main Window. They are used to collapse one age group into a smaller one. For example, if you run a session with an age grouping of Single Ages, then you could collapse it down to 19 Age Groups for examination purposes.
Controls
-
Collapsible Age Groups list - This list displays all of the collapsible age groups defined in the application. You can select an item and then edit it or delete it. Items in the list followed by a "*" are age groups that cannot be modified. They must always be there for basic support.
-
Add button - Pressing this button will display the Age Group Edit Window to allow you create a new age group.
-
Edit button - Pressing this button will display the Age Group Edit Window to allow you edit the currently selected age group in the list. You cannot edit age groups with a "*" after their name.
-
Delete button - Pressing this button will delete the currently selected age group in the list. You cannot delete age groups with a "*" after their name.
Related Items
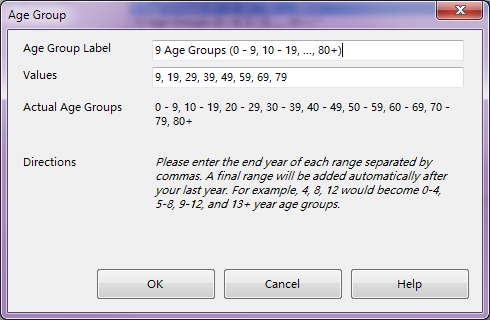
A window used to add or edit a new collapsible age group.

Description
This window is used to add or edit a collapsible age group in the Age Groups Tab of the Options Window. Collapsible Age Groups allow you collapse from a large group to a smaller group. For example, if you have session that has 19 Age Groups, you could collapse this to 9 Age Groups or 5 Age Groups.
Controls
-
Age Group Label edit box - This box contains the name used for this age group. Its is good practice to include an example of the age groups in the label. For example, for an age group with 9 groups, the name would be "9 Age Groups (0 - 9, 10 - 19, ... 80+)".
-
Values edit box - This box allows you to enter the end years for each group. An additional group will be added for all ages past your last year. The Actual Age Groups display will display the actual age groups that will be created from what you have entered here. For example, if you enter 3, 20, 47, then the actual age groups will be 0 - 3, 4 - 20, 21 - 47, and 48+. The last group is automatically added to cover all remaining ages.
-
Actual Age Groups display - This display shows the actual age groups that will be created based on the values entered in the Values edit box.


