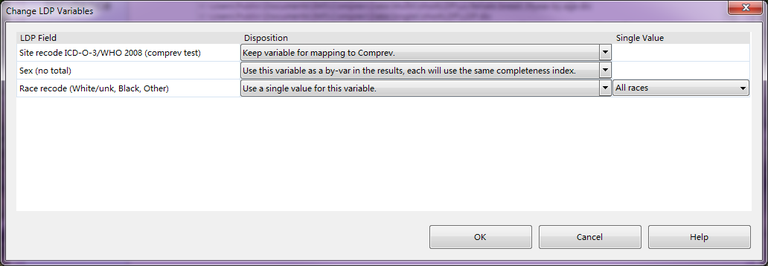
This window allows you to configure how the LDP variables are used in ComPrev.

Description
This window allows you specify the disposition of variables in the LDP import dictionary. This window is optional and is not required to perform an LDP import. There are three possible dispositions for an LDP variable:
-
"Keep variable for mapping to Comprev" - This is the default setting for all LDP variables. It means that you must map this variable to a ComPrev variable.
-
"Use this variable as a by-var in the results, each will use the same completeness index" - This setting is used to tell Comprev that you wish to use this variable as a by-var in the session. For example, if you have an LDP import file with the variables Site, Sex, Race, and Region, you will not be able to map this file to a data source which has the variables Site, Sex, and Race. In this window you would set the Region variable to "Use this variable as a by-var in the results, each will use the same completeness index." This would cause the Region variable to not need to be mapped in the Data Mapping Window. When the session is calculated, there would be a 4th variable Region in the cohort list.
-
"Use a single value for this variable" - This setting is used to set a specific value for this LDP variable. Once selected, the Single Value column becomes enabled and you can pick one of the values to be used for this variable. For example, you have an LDP import file with the variables Site, Sex, and Country. But you only want to use the data for the records which are from Italy. For the Country variable, you would select "Use a single value for this variable", and then select "Italy" for the Single Value. This variable would not need to be mapped in the Data Mapping Window.
Controls
-
Field grid - This grid displays all of the variables in the LDP import dictionary. The default value for all variables is "Keep variable for mapping to Comprev". You can use the combo box in the second column to set a different disposition for each variable.
-
OK button - Pressing this button confirms your changes, saves them, and closes the window.
-
Cancel button - Pressing this button cancels any changes you have made and closes the window.
-
Help button - Pressing this button displays this help page.
Related Items