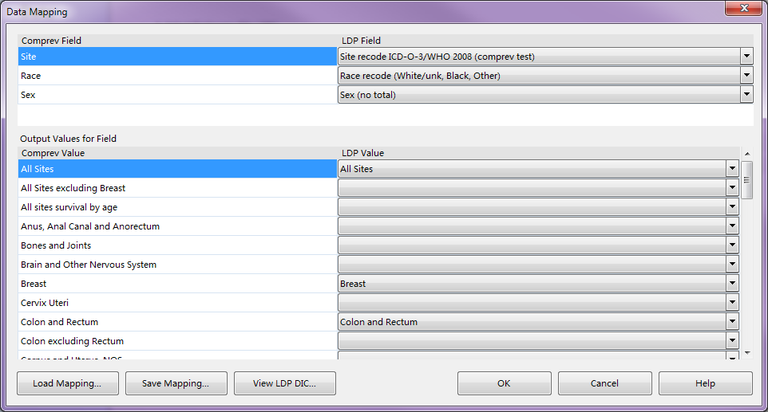
This window allows you to configure the mapping of variables from the LDP Import file to ComPrev.

Description
This window creates a mapping between your imported LDP file and the variables used in the data source. The variables used in the data source and those used in the LDP import dictionary may be different. So we need to map the variables together.
For example, the data source which comes with ComPrev has the variables Site, Race, and Sex. Then the imported LDP dictionary has the variables Cancer Site, Ethnicity, and Sexuality. We know that these field go together, but Comprev does not. We need to tell ComPrev that the Site variable in the data source matches the Cancer Site variable in the LDP dictionary.
Beyond the variables themselves, the values within those variables may be different as well. Once we establish that two variables go together, we need to say which values within those variables match up.
The normal routine of using this window is to use the grid at the top first. For each ComPrev field, we use the combo boxes to select a corresponding LDP field. After we have matched two variables together, we look at the grid at the bottom which displays all of the ComPrev values for that variables. We use the combo boxes on the right side of the grid to select the LDP value that matches the ComPrev value.
ComPrev will try to perform as much of the mapping work as possible for you. When you first launch this window, you will see values already filled in. ComPrev has already gone through and matched all of the variables and values that have the same name. You can change these mappings or leave them as they are.
When selecting an LDP field, it may turn out that there is no corresponding variable. For example, your LDP data file may only contain Race and Sex, but no Site. You can still use this file however. In the LDP Field combo box, there is a selection for "[No LDP field. Select ComPrev value below:]". Listed under this selection are values for the Comprev Field to use. If you select one of these values, you are telling ComPrev to use a specific value for that ComPrev variable. Continuing the previous example, for the ComPrev field "Site" we would extend the combo box list and possibly select the value "All Sites". This tells ComPrev to just use the value "All Sites" for the variable Site. All records in the LDP data file will map to the value "All Sites".
In another example, you could have an LDP data file which contains no variables. In this case, you would need to set a specific value for each of the ComPrev variables. All of the LDP data would be mapped to these specific values.
Controls
-
Field grid - This grid displays all of the ComPrev variables in the first column, and then the second column contains the matching LDP variables. Each of these combo boxes in the second column must have a value for the mapping to be complete. The LDP Field allows you select a variable from the LDP dictionary, or you can set this to a specific Comprev value (meaning that there is no corresponding LDP variable). For the variable selected in this grid, all of the values for that variable are displayed in the Output Values for Field grid.
-
Output Values for Field grid - This grid displays all of the values for the selected variable in the Field grid. The first column displays the values contained with the data source. The second column displays combo boxes which allow you to pick the corresponding LDP data file value. You do not need to map every ComPrev value, but you do need to map every LDP value.
-
Load Mapping button - This button will display the Open File dialog and allow you to pick a saved mapping file. The grids on this window will update with the saved information. Keep in mind that the load will not take place if the variables don't match exactly.
-
Save Mapping button - This button will display the Save File dialog and allow you to save the current mapping to an external file. This is useful if you perform multiple sessions using the same LDP data file.
-
View LDP DIC button - This button will display the View File Window and show you the DIC and TXT file for this LDP import.
-
OK button - Pressing this button will save this mapping and close this window. If there are any issues to be corrected with the mapping, a message will be displayed indicating the problem.
-
Cancel button - Pressing this button will cancel the mapping and close this window.
- Help button - Pressing this button will display this help page.
Related Items